Monday, 23 December 2013

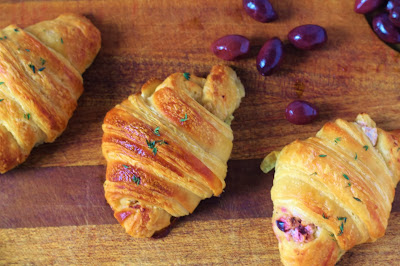
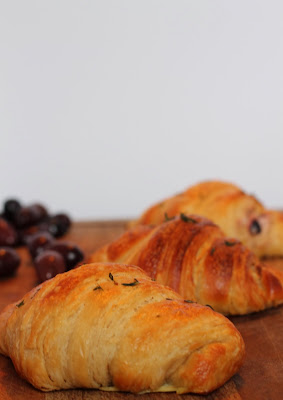
Croissants Part III: Goat's cheese, olive and thyme croissants

Goat's cheese, olive and thyme croissants

I can’t wait to be 90. I really can’t. Assuming that I make it that far (with all my faculties intact!) and that the retirement age hasn’t been raised to 126 by then – admittedly, both fairly big assumptions to make - my plan is to sit at home all day watching Christmas films (even if it’s mid-summer. That’s right, ‘Elf’ in June. Just try to stop me, I‘ll be 90, like I'll care), sipping on endless cups of tea and making my way through as many slices of cakeage a day as I can manage (what is it with getting older and eating cake? They just seem to come hand in hand).

Goat's cheese, olive and thyme croissants

Honestly, sometimes I wonder if I’m already a 90 year-old stuck in a younger person’s body, particularly when it comes to my sweet tooth. It knows no bounds. Take today: thus far my nutritional intake has consisted of biscuits, caramel popcorn, a few token pieces of fruit and an obscene amount of chocolate. And this is no exception, I’ve always been this way: I end every single day, without fail, with something sweet; I choose - and reject - restaurants based on their dessert menus; and once, during a meal at an all-you-can-eat buffet restaurant, I actually started with dessert - a hefty slice of double chocolate fudge cake.

How I have survived this long without needing any fillings is beyond me. No doubt I will get my comeuppance one day, but I figure at that point the inner nonagenarian in me will simply embrace dentures. As long as I can still manage a slab of cake, it’s all good right?

Goat's cheese, olive and thyme croissants

And yet, recently strange goings-on seem to be afoot. I have a new-found love you see... goat’s cheese. I am freaking obsessed with the stuff and my love for it is so far-reaching that after almost two years of blogging only about sugary baked goodness – cue fanfare - I am finally posting a savoury bake! Yip, told you, strange happenings indeedy.


Goat's cheese, olive and thyme croissants

I don’t know if this will set a precedent on ‘A Cup of Tea Solves Everything’ - there are far too many cookie, cake, chocolate and biscuit baking ideas running around in that tiny little mind of mine – but for now, let’s take a moment to enjoy this post in all its glory, because believe me, these croissants truly are glorious. Even people who were sceptical about goat’s cheese loved them, that’s how good they are. And if you think your own taste-testers might be put off by the filling, do what I did and don’t tell them what's inside until after they’ve eaten the croissants. By that time I promise you, they’ll be hooked.

Goat's cheese, olive and thyme croissants

Makes 20-24 large croissants

Technical Notes:

  • The croissant dough I've used is the same one I used in my Bourke St Bakery croissants post but I have reduced the amount of sugar in the dough to account for this being a savoury bake.
  • If you’re not sure about goat’s cheese, you could substitute it for any other soft cheese really (Roule, Boursin, Philadelphia), but if you get a really mild goat’s cheese, trust me, it's so creamy, it works perfectly with the Kalamata olives and thyme!
  • You can egg-wash your croissants just the once - after proving, before they go in the oven - but I do it twice: once immediately prior to proving and once after, and I would highly recommend you do the same. It gives the pastries a much deeper golden colour once baked.
  • If you haven’t made croissants before, the two pieces of advice I would give you are: allow yourself plenty of time to make them; and don’t be afraid – they’re time-consuming but not difficult, and so completely and utterly worth it.

Ingredients (croissant dough recipe adapted from Bourke St Bakery)


Ferment (this is a small amount of dough that needs to be made first and will help your croissant dough develop and rise):
  • 100g plain flour
  • 55ml whole milk
  • 5g (or 1 tsp) brown sugar
  • A pinch of salt
  • 5g fresh yeast (I bought mine from the bakery counter at Tesco.  Alternatively, use 1 tsp dried instant yeast)
  • 20g unsalted butter, softened

Dough (chill everything in the fridge before you start making the dough, including the flour and sugar):
  • 935g strong white flour
  • 500ml whole milk
  • 25g brown sugar
  • 15g salt
  • 35g fresh yeast (or 2 tsp dried instant yeast)
  • Plus 500g unsalted butter, for laminating (the rolling and folding process for the dough) - use good quality French butter if you can, it makes a difference

For the filling:
  • 450g soft, mild goats' cheese
  • 150g Kalamata olives, pitted and chopped roughly
  • Thyme leaves (the quantity depends on your personal preference but I probably stripped the leaves from about 20 sprigs for my filling)
Egg wash:
  • 1 egg
  • 80ml milk
  • Pinch of salt
  • Thyme leaves
To make the ferment
You can make the ferment up to three days in advance of using it and just store it in the fridge in the meantime.  At the very least it needs to rest in the fridge for two hours, or even overnight, before being used to make your dough.

Put all of the ferment ingredients into a bowl and, using your hands, bring the ingredients together until they begin to form a dough ball.  Remove the ball from the bowl and knead it for 10 minutes on a clean surface, until you have a smooth, elastic dough.

If using an electric mixer, put all the ingredients into your mixer bowl and process on a low speed for 3-5 minutes, until you have a smooth, elastic dough.

Once you have your elastic dough (using either method), shape it into a ball and leave in a bowl at room temperature for 2 hours, then cover the bowl with clingfilm and refrigerate for a minimum of two hours or until ready to use.

To make the croissant dough
Once you've made the dough, like the ferment, it needs to rest for at least two hours, or preferably overnight, before it is laminated and shaped so take this into account with your baking. You could make it the same day as the ferment, but you can only do so once your ferment has chilled in the fridge for a couple of hours.

If using an electric mixer, put the flour, milk, sugar, salt, yeast and your chilled ferment in the bowl of a mixer fitted with a dough hook (note, the butter for laminating should not be added here!) Process on a low speed for 3-4 minutes, then increase the speed to high and mix for a further 2 minutes.

If making by hand, bring the ingredients together in a bowl first and then knead by hand on a clean surface for 10-15 minutes, until you have a smooth, elastic dough.

Gather the dough into a ball, put it into a clean plastic bag and refrigerate for at least 2 hours, or preferably overnight.

Laminating the dough
Laminating and shaping the dough will take about five or so hours in total, including rest periods for the dough.

Remove dough from the fridge, together with the butter – both should be about the same temperature.

Put the butter between two sheets of baking paper and use a rolling pin to gently pound the butter into a 20cm square about 1cm thick.

Using a lightly floured rolling pin (or even better, a silicone rolling pin - trust me, this makes life so much easier!), roll the dough out into a 20 x 40 cm rectangle.  Remove the butter from between the baking paper and place it in the centre of the dough, then fold the two sides of pastry over the top of the butter, pinching them together at the ends and all along the seams to ensure the butter is completely enclosed in the pastry.

Next, carefully roll the pastry out again, this time into a rectangle about 20 x 90 cm.  Fold one 20cm end of the rectangle in by one third, then fold the other 20cm end over the top (like folding a letter) so the dough is now 20 x 30 cm.  Put your dough back in its plastic bag, (or wrap it in clingfilm), place it on a tray and refrigerate for 20 minutes to allow the gluten to relax.

Repeat this rolling and folding process two more times, ensuring that before rolling the pastry for the second and third time, you rotate it by 90 degrees (so that the dough is rolled in a different direction to the previous fold as this is how you create the flaky layers of pastry), and that you rest the dough in the fridge again (in its plastic bag) for 20 minutes after each of the second and third ‘turns’ (folding and rolling).

Making the filling
Whilst the dough is resting in the fridge for the final time, make the filling by tipping the goat's cheese, chopped olives and thyme leaves into a bowl and stirring together to incorporate.

Shaping and filling the dough
Once the dough has had its third and final 20 minute rest in the fridge, roll it into a 25 x 120 cm rectangle.  This can take some effort as the dough will resist being rolled out, but persist, you’ll get there.  Use a light sprinkle of flour to patch up areas where there may be butter poking out while you roll.

Using a ruler, along the bottom long side of your rectangle, use a knife to make a small cut every 9cm.  Across the top long side of your rectangle, first make a small incision at 4.5cm and then at every 9cm after that, so that the top incisions are directly in the middle of the ones across the bottom.

Line your ruler up between the first bottom incision and the first top incision. Use a knife to cut along the line.  Then rule from that same top incision to the next bottom incision and cut along that line so that you have cut out triangle.  Continue all the way along the pastry with the remaining incisions.  You’ll end up with about 24 triangles, plus two half triangles (ball these together and keep the dough ball in a small bag in the fridge, you may want it when filling the croissants).

Stack the triangles on a tray lined with baking paper, cover lightly with a clean tea towel and put in the fridge to rest for about 10-20 minutes.

Remove from the fridge and, working one triangle at a time, make a small incision at the mid-point of each triangle’s base.  Gently pull the two corners of pastry that are either side of your incision outwards and pull the tip of the triangle upwards to elongate it as much as possible.

Place a heaped teaspoon of the goat's cheese filling at the base of the triangle, just above the incision.  If you're worried about the filling leaking out, this where your leftover dough can be used: take a small amount and roll two thin sausage shapes, no more than 2cm in length. Place one each side of the filling to act as a sort of cushion.

Now roll the base of the croissant up over the filling and then continue to roll towards the tip of the triangle, stretching the tip out further as you get closer to it.  Once the triangle is fully rolled, press the tip into the croissant to secure, and place the croissant, tip-side down, back onto the tray lined with baking paper. Repeat with remaining triangles, spacing them well apart on the tray (I place 5-6 croissants max on each tray).

If you want to, you can now prove the croissants immediately for baking, or cover them with a clean tea towel and refrigerate overnight for proving and baking the following day. Alternatively freeze for later use.

Proving and baking
Before the croissants can be baked, they need to prove (or rise). If they’ve been in the fridge overnight, remove them from the fridge.

Make your egg wash by beating the egg, milk and salt together in a bowl. With a pastry brush, brush the wash over each croissant then cover them with a fresh, damp tea towel and leave them in a warm place for 2 – 2.5 hours until they have more or less doubled in size (if you are proving straight away after rolling i.e. your croissants are not chilled, you will need only 1.5 – 2 hours for proving. If proving croissants from frozen, prove for 2.5 - 3 hours).

Once the croissants are almost at the end of their proving time, preheat your oven on as high a temperature as it will go.

At the end of the proving time, brush the croissants again with the egg wash, sprinkle with a few thyme leave and place in the oven, reducing the temperature immediately to 190C (175C for a fan oven).

Bake for 19-20 minutes, until they are a beautiful golden colour (they should almost look burnt.  The further baked they are, the more they will rise and the better the layers of flakiness). Remove from the oven and allow to cool slightly before eating.

Sunday, 24 November 2013

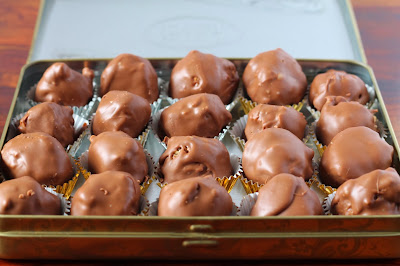
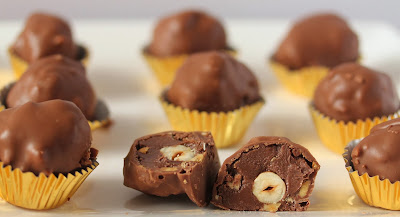
Chocolate Orange Ferrero Rochers

Chocolate Orange Ferrero Rochers

Although there's no denying that I love my food, I'd like to think that I'm not a pretentious foodie. My daily diet does not consist of such things as quinoa and pearl barley, I don't breakfast on wheatgerm smoothies and if I'm going to snack, it's not likely to be on kale crisps or chia seeds.

Having said this, I must confess that I can be a snob about chocolate. I'm ashamed to admit that I once looked so disappointed at receiving a particular box of chocolates that the person who'd bought them for me promptly snatched the box back out of my hands and wouldn't let me have it. Not my finest hour I'll admit, but I've worked on receiving gifts more graciously since then I promise (and for future reference, it was those seashell-shaped confections that taste as though they contain only about 1% cocoa and 99% I don't know what).

Chocolate Orange Ferrero Rochers

So yes, I can be elitist about chocolate; I would rather spend all my pocket money on one tiny morsel of Paul A Young's salted caramel popcorn bark or indulge only once every few months in William Curley's almond and orange caramel mou bar (which frankly might be my most favourite ever chocolate based on its name alone - I mean it's called a 'mou bar'!) than choose to eat those seashell chocolates every day of the week.

Chocolate Orange Ferrero Rochers

But before anyone gets cross with me, let me qualify my snobbery: I am not saying I will only eat expensive chocolate; I'm saying I will only eat good quality chocolate. To my mind, the two need not be synonymous and Ferrero Rochers surely prove my point - they won't break the bank and doesn't everyone agree that they're scrummy?!

Because I'm so enamoured with them, I decided it was time to have a go at making my own Nutella-filled nuggets of chocolatyness, but with a twist - the addition of my favourite ingredient to complement chocolate: orange! I loved how they turned out and am sure that any chocolate snob would approve! 

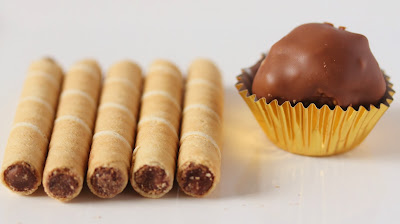
Hazelnut wafer biscuits and a homemade Chocolate Orange Ferrero Rocher

These Ferrero Rochers were easy to whip up and would make a great Christmas present if you want to add a personal touch to your gifts this year. For other homemade Christmas gift ideas, see Christmas Rocky Road and chocolate orange biscuit truffles.

Adapted from Scoochmaroo's Ferrero Rochers

Makes approx. 30 chocolates (I got 29)
  • 80g hazelnuts
  • 85g hazelnut wafer biscuits
  • 400g chocolate orange spread*, refrigerated for at least an hour beforehand
  • 260g good quality milk chocolate (35% cocoa) or plain chocolate (50% cocoa)
*If you can’t find chocolate orange spread, you could use standard hazelnut chocolate spread/Nutella with either the zest of a small orange mixed thoroughly through it or a few drops of orange oil added.  Alternatively, if preferred, omit the orange flavouring entirely to make standard Ferrero Rochers.
Preheat the oven to 180C (160C fan).

Place the hazelnuts onto a baking sheet and toast in the oven for 10-12 minutes, checking every three or four minutes to give them a shake and make sure they’re not burning.

Remove hazelnuts from the oven and allow to cool before placing them in a tea towel and rubbing vigorously to remove as much of the papery skins as possible.

Set aside 30 whole nuts and chop the rest fairly finely, either by blitzing them for a few seconds in a food processor or as I did, the old-fashioned way, on a chopping board with a knife.

Place the wafer biscuits in a Ziploc bag and bash with a rolling pin until they’re finely crushed.

Tip the biscuits and chopped hazelnuts into a bowl and mix together with a spoon.

Line a baking sheet with greaseproof paper.

Remove the chocolate spread/Nutella from the fridge and working quickly with a teaspoon – or ideally a melon baller – scoop a small ball from the jar (it should be roughly the size you want your final Ferrero Rochers to be).

Whilst the ball is still on the spoon, push a whole hazelnut into the middle.

Drop the ball into the biscuit/chopped nuts mix and roll it around until its surface is entirely covered.  Place on the lined baking sheet.

Repeat until you have made all your chocolate balls, then place the tray in the freezer for 45 minutes to an hour.

Once the chocolate balls have been in the freezer for the required time, break the milk or plain chocolate into pieces in a bowl and melt either in the microwave or a bain marie.

Allow the chocolate to cool slightly, then remove chocolate balls from the freezer.

Working quickly, drop the balls one by one in the melted chocolate to coat them completely.

Remove from the chocolate with a fork and place back on the lined baking sheet to set.  You will find that the chocolate coating will start to go set almost immediately against the cold chocolate balls.

Once all of the rochers have been coated, place the tray in the fridge for an hour to set completely.

Chocolate Orange Ferrero Rochers

Sunday, 20 October 2013

Speculoos, banana and chocolate chunk cookies

Speculoos, banana and chocolate chunk cookies

Well before the Great British Bake Off, there was a daytime cookery programme on television called ‘Ready, Steady, Cook’. The premise of the show was to pair celebrity chefs up with contestants who would present them with a bag of mystery ingredients; each chef then had just 20 minutes to make something from scratch for/with the help of their contestant, using said ingredients.

Speculoos, banana and chocolate chunk cookies

Whilst watching the programme, I would always ponder what I'd take along in my bag if I were ever on the show. Invariably I’d settle upon ingredients that I knew would give the chefs no other option than to make something sweet and, ideally, chocolaty.  I mean come on, 20 minutes for a top chef to make something especially for you - surely it would be bonkerdom to want them to make anything other than a dessert!

Speculoos, banana and chocolate chunk cookies

Anyhoo, a few months ago a very lovely friend of mine came over for dinner and I was reminded of ‘Ready, Steady, Cook’ because, rather than conforming to the norm and bringing flowers or a box of chocolates (not that I would ever object to receiving either of those things should you be so inclined), my friend brought me ingredients. As I pulled each thing out of the bag, I contemplated what I could make with it, as though I myself were one of the famous chefs (humour me here) on the show once so beloved by me. The pièce de resistance of all the ingredients was a jar of Speculoos: a delicious Belgian biscuit-spread made from crushed, spiced biscuits, with a sort of gingerbread-like or caramelised taste to it.

Speculoos, banana and chocolate chunk cookies

After a couple of months of research and deliberation (this is not a matter to be taken lightly people!) I opted to use the spread to bake Speculoos, banana and chocolate chunk cookies. I liked these cookies.  I liked them a lot.  They’re warm and earthy and comforting with a crisp outside and a chewy interior – as cookie-like as a cookie should be.

Speculoos, banana and chocolate chunk cookies


Note: When I first baked these, I found the banana overpowered the Speculoos a little so in the recipe below, I’ve toned down the banana and increased the biscuit spread:unsalted butter ratio so that you really get a hit of the spices.

Makes about 26 medium-sized cookies
  • 85g unsalted butter, melted
  • 8 tbsp Speculoos
  • 165g light brown sugar
  • 105g granulated sugar
  • 1 egg yolk (from a large egg)
  • 2 tsp vanilla extract
  • 1 ripe banana (medium size), roughly mashed
  • 300g plain flour
  • ½ tsp baking soda
  • 200g plain chocolate (40% cocoa), chopped into chunks

Beat the melted butter, Speculoos and two sugars together in a large bowl until combined (I used a handheld electric whisk but a wooden spoon will work just as well).

Next, beat in the egg yolk and vanilla extract before adding in the mashed banana and beating again.

Sift the flour and baking soda together then add in thirds to the wet ingredients, mixing until it is all incorporated and you have a cookie dough consistency.

Finally, add in chocolate chips.

At this point, ideally refrigerate the dough for a minimum of two hours, but preferably overnight, so that you get a chewier cookie at the end of the baking process.

When ready to bake, preheat the oven to 160C (fan) and line two flat baking sheets with greaseproof paper.

Shape the dough into roughly the size of a golf ball and place on the baking sheets about 2 inches apart from each other.  If you’re using two baking sheets, all the cookies will not fit on at the same time, so you will need to shape and bake them in two batches.

Bake for 12 minutes, until the edges are golden and the middles are puffy.

Sunday, 1 September 2013

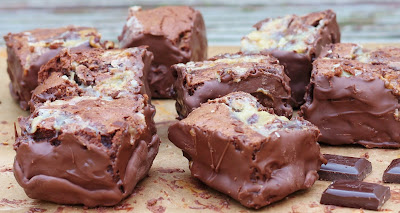
Chocolate-coated salted caramel brownies

Chocolate-coated salted caramel brownies

It’s generally understood that when someone refers to their ‘other half’ they are talking about their spouse or partner. My other half though is neither of these things and on top of that, we met before either of us was even born. Yes, she and I spent a cosy nine months together in my mumma’s tummy, snug as two bugs in a rug before, as she likes to say, she ‘booted me out’ and a minute later graced the world with her own presence. In case you haven’t figured out what – or rather whom - I’m blathering on about this time, it’s my twin sister.

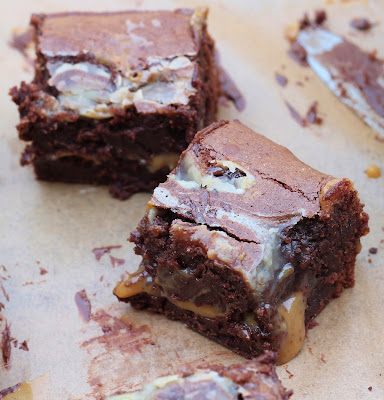
Salted caramel brownies before being coated with chocolate

In anticipation of your immediate questions: yes, we are identical; and no, we’re not telepathic (seriously? How many mind-readers do you actually know?) Based on lifelong experience, I assume your third question is ‘What’s it like to be a twin?’ I always feel rather stumped when people ask me that. It’s not that I don’t understand their curiosity, I do, but where does one begin?

Growing up as twins we would always get attention, people would be fascinated and want to ask all manner of questions, and kids at school thought we were pretty cool (until they figured out I at least was in fact a total geek). Moreover, you’d always have someone to play dress-up with, share secrets with and talk to – a best friend whom you hadn’t had to earn, you’d been given automatically.

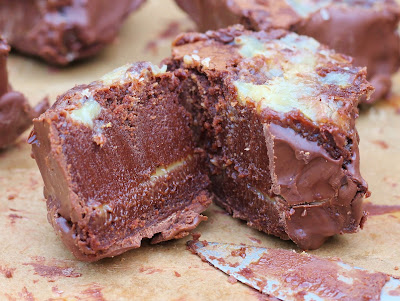
The middle of a chocolate-coated salted caramel brownie

On the other hand, there was a constant battle to be seen as individuals: we hated being made to wear the same clothes well into our teens; we didn’t always love sharing the attention (or more specifically for me, the cake!) every birthday; and it was tedious when people who couldn’t be bothered to learn which of us was which would just say both our names together in quick succession – almost like a double-barrelled name - knowing full well that would get the attention of whichever one of us they were trying to talk to.

This struggle for individuality is probably what’s led us to follow such different paths: I moved away from home for university and studied social sciences and languages, she stayed close to home and studied medicine; I graduated and began a succession of office jobs, she graduated and began her career as a successful surgeon, taking time out recently to do her PhD at Harvard (you can see who got the lion’s share of the brains!)

Salted caramel brownies

Yet despite our efforts over the years to carve ourselves out as two different people - as individuals in our own right - when I ponder it, I really don’t think we’re all that different after all: we both love food (sweet over savoury), clothes, travelling, chubby babies, terrible romcoms and learning languages; we talk and sound so alike, even our parents get confused on the phone to us (although to my dismay after such a long time across the pond, she now uses some wholly unacceptable American words like ‘trash’. Hmph); and whilst we may not be telepathic, we are so alike that we can, and often do, finish one another’s sentences.

Now, after four years away in Boston living it up and doing a little bit of studying on the side(!) twinny is coming home... in just a few days! Eek, I can hardly believe that I’m getting my other half back! However it must be true. Why? Because she’s already ordered a whole list of things she wants me to bake for her upon her return! These chocolate-coated salted caramel brownies, not surprisingly, are on said list.

Salted caramel brownies

I’ve baked these brownies more than once already and I absolutely love, love, love them. It’s not just that the caramel and sea salt work so well with the ridiculously gooey brownie, it’s the chocolate coating. It perfects them. As you take a bite, it flakes off and melts on your tongue before your mouth gets welded shut by the sticky caramel and brownie centre. Oh. My. They’re insanely good I tell you. Insanely good.

Makes approximately 36 brownies
  • 300g unsalted butter
  • 300g dark chocolate (70% cocoa), broken into pieces
  • 5 large eggs
  • 350g granulated sugar
  • 1 tbsp vanilla extract
  • 200g plain flour
  • ½ tsp table salt
  • Approximately 400g of soft caramel or dulce de leche (I used a tin of Nestle caramel but you can make your own if you prefer)
  • Pinch of Maldon salt/fleur du sel for sprinkling
  • 500g chocolate for coating the brownies, broken into pieces (I mixed 300g of milk and 200g of plain/40% chocolate for this but you can use whatever you like – milk, plain, dark, white!) 
Preheat oven to 180C and grease and line the base and sides of a deep 9 x 9” square tin.

Melt the butter and chocolate together in a bowl either in the microwave (on 30 second bursts, mixing in between until the two have melted and are fully combined) or suspended over a pan of barely simmering water (a bain-marie. Ensure the bowl of chocolate and butter does not come into contact with the water). Once melted, set aside.

In a large clean bowl, beat the eggs, sugar and vanilla together until thick and creamy. Using a handheld electric whisk, this will take 3-4 minutes; by the end, the mix should coat the back of a spoon.

Add the melted butter and chocolate to the egg mix and beat again until combined.

Sift the flour and salt together and then beat them into the mixture until you have a thick, smooth batter.

Pour or spoon half the batter into your cake tin, ensuring it is evenly distributed.

Next, pour over about two-thirds of the caramel, spreading it evenly with the back of a spoon so that you have an even layer of it over the brownie batter.

Spoon/pour the remaining batter into the tin, covering the caramel layer.

Spoon dollops of the remaining caramel randomly over the top. Using a palette knife, gently swirl the caramel into the chocolate mixture to create a patterned effect.

Bake in the oven at 180C for 25-27 minutes. However, if you have a fan oven, after 7 minutes, reduce the oven temperature to 160C and bake for the remaining 18-20 minutes.

When you remove the tin from the oven, the brownie batter should have a crust on top but will still be very, very wobbly.  If you prefer to bake the brownie for longer, you can put it back in the oven for another 5-10 minutes but be careful not to over-bake – you’ll end up with dry brownies, rather than gooey ones. If you’re brave enough to undercook like I do, I'd do so.

As soon as you've taken the giant brownie out of the oven, sprinkle a generous pinch of salt all over the top.

Once the tin has cooled, place it in the fridge for about 5 hours to set (or ideally overnight).

Once the brownie has cooled and set, turn out from the tin onto a chopping board and set it the right way up.

Using a large, sharp knife, cut into squares as big or small as you like (I cut into 36 pieces but you could go even smaller).

Melt the 500g chocolate in a bowl, either in the microwave or over a bain-marie and line a shallow baking tray with greaseproof paper.

Carefully take each brownie, holding it by the top and bottom over the bowl of melted chocolate, and using a palette knife or spatula, spread a thin coating of the chocolate onto the four sides of the brownie. Then place the brownie upside down onto your lined baking tray before spreading a thin coating of chocolate over the base (this means, once the chocolate has set, only the top of your brownies won't be coated, allowing for the swirled effect on top to be visible).

Once the sides and bottom of all of the brownies have been coated with chocolate, place in the fridge for an hour to set.  Finally, devour!

Saturday, 24 August 2013

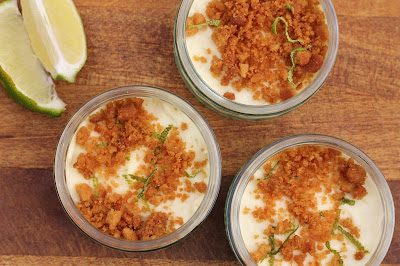
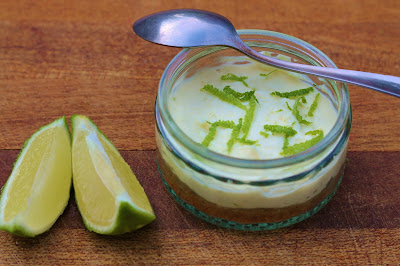
Lime and ginger cheesecake (no-bake)

Lime and ginger cheesecake

Big brothers, they're a pain right? They think they know better than you purely because they're a couple of years older (they sooo don't); they get ridiculously overprotective when they see you talking to pretty much anyone from the male of the species; they reckon they know how to make a better cup of tea than you (I don't think so); and then they pretend that they don't read your blog but subsequently tell you that you post too many chocolate based recipes on it. Too many chocolate based recipes??? Pfft, right, like that's even possible!


And I'm not finished there. The litany of complaints continues: despite untold damage to their street cred, they literally hold your hand pretty much every day of your first year at school because you're too shy to talk to anyone and keep blubbering like a baby; they wake up at stupid times of the night to pick you up from the airport after your holidays so that you don't have to make your own way home with your oversized suitcase crammed with beauty lotions and potions and half your wardrobe; they buy you ridiculously expensive chocolates for no reason other than they know how much you love those teeny-weeny salted caramel truffles that cost a small fortune; and to cap things off, they give you darn good hugs and a shoulder to cry on when some loserface breaks your heart.

Lime and ginger cheesecake

So you see, it's like I said, they're a pain. Furthermore, let it be clear that the non-chocolate based blog recipe below is purely to prove a point (this is in fact my second chocolate-free post in a row); in no way is it an attempt to please brother dearest. Hmph.

Lime and ginger cheesecake

I can't take the credit for this recipe. It comes from a lovely colleague of mine, John, who not only was kind enough to make this amazing cheesecake for me, he then let me have the recipe and agreed to let me share it with you on my blog. So John, we salute you!

As it's a no-bake cheesecake, this is a pretty easy recipe to follow, yet it tastes incredible; I love the ginger and lime combination. Because I always feel short changed on the biscuit part of cheesecakes, I usually increase the amount of the base, but in this instance, instead I sprinkled extra crushed biscuit on top - almost like a crumble topping - so that you get delicious buttery ginger biscuit either side of the creamy hint-of-lime cheese. I also upped my mascarpone to cream cheese ratio because I love the rich smoothness of mascarpone. Served in individual ramekins, it makes an impressive-looking dessert...even if there's no chocolate in it!

Adapted from my friend John's recipe!

Serves 15-18 (you will need 15-18 ramekins. Alternatively make in one large, shallow dish)
  • 400g ginger nuts
  • 120g unsalted butter, melted
  • 300g cream cheese (I used full-fat Philadelphia)
  • 250g mascarpone
  • 100g caster sugar
  • Zest and juice of 1 lime
Place the biscuits in a food processor and blitz to a fine crumb. Alternatively, place them in a plastic sandwich bag and bash with a rolling pin until they are crushed then place them in a bowl. Add the melted butter to the biscuits and mix thoroughly to combine.

Set aside about a quarter of the crushed butter-biscuit mix in a small bowl, saving it for the topping. Layer the remaining three quarters in the base of your large serving dish or into your ramekins (I made individual desserts and had enough to layer 17 ramekins, filling each one with about three teaspoons of the mix). Press the crumbs down firmly with the back of a spoon or your fingers to even it out and so that it is approximately one centimetre in depth.

Chill in the fridge for 45 minutes to an hour.

Tip the two cheeses, sugar, lime zest and juice into a bowl and beat together with a wooden spoon until well mixed.

Remove the chilled biscuit layer from the fridge and spoon the cheese mix over the base, spreading it evenly so that it is about a centimetre thick.

Sprinkle the remaining biscuit crumbs that you had set aside over the cheese layer for decoration.
Cover with clingfilm and refrigerate again for at least two hours to allow to set.

The cheesecake should keep fine (covered to prevent it from drying out) in the fridge for three to four days.

Thursday, 8 August 2013

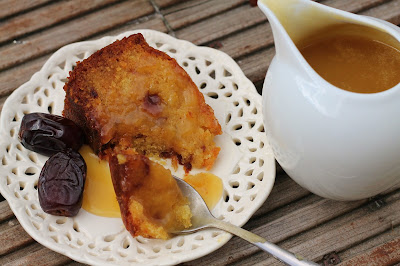
Sticky date and orange cake

Sticky date and orange cake with toffee sauce

I'd like to tell you a story about dates.

In case you’ve missed the glaringly obvious title of this post and are anticipating some amusing or exciting anecdotes about my personal life - for which you’d be forgiven in light of my aptitude to ramble on about things totally unrelated to baking – I’d better stop you right there.  I hate to disappoint you but no, in this instance I’m talking dates of the edible, fruity kind.

Sticky date and orange cake with toffee sauce and Ajwa dates

Dates and I, we have a chequered history.  I didn’t use to like them.  Every time I tried to eat one, I'd chew...and chew...and chew - like a camel chewing on cud - but I’d find it sticking stubbornly in my throat.  The problem was that I couldn’t understand why, given my passion for all things sweet, I couldn’t form an amicable relationship with something that looked like it should taste of deliciously soft toffee.  Despite my aversion, I so very much wanted to like dates.

So I persisted and then one day, as if by magic, my persistence paid off: I fell in love.

Sticky date and orange cake with toffee sauce

Now that I’ve acquired the taste, I can’t seem to get enough.  I’ll eat all varieties, even at a push the far too syrupy, not enough flesh, under-ripe sort, but preferably plump, juicy, Medjool dates or, better yet, fresh Ajwa dates that frustratingly only seem to be available in the UK during Ramadan (if any food buyers are reading this, please pretty please with a cherry on top could you make them available more frequently, just for me?)

An orange and Ajwa dates

The best thing is that dates are good for you and that, amigos, means that this cake is good for you too!  In fact, as it contains not only dates but oranges too, I do believe we might just have ourselves two of our five a day all wrapped up neatly in one delicious cake!

Okay, so I’m pushing things slightly with that claim but honestly, this cake tasted so scrummy, I find it hard to believe the happiness derived from eating it didn’t do me some good!  It was soft, sticky, damp and yummy in my tummy!

Sticky date and orange cake with toffee sauce
Yields 10-12 slices

Serve either warm as a dessert with hot toffee sauce poured over (see below for recipe), or cold as an afternoon treat with some double cream drizzled on top.

For the cake:
  • 300g butter, softened, plus a little extra for greasing the tin
  • 250g caster sugar 
  • 4 large eggs 
  • 150g self-raising flour, sifted (preferably three times)
  • 150g blanched almonds, whizzed in a food processor until very fine
  • 200g dates, stoned and chopped (I used Ajwa. Medjool will also work but if you can't get either of these, soak standard dates in hot water for 20-30 minutes before stoning and chopping for the cake)
  • Zest of 3 oranges

For the drizzle:
  • 85g golden granulated sugar
  • Juice of 2 fresh oranges

For the toffee sauce (optional):
  • 150g butter, melted
  • 220g soft light brown sugar 
  • 200ml double cream

To make the cake
Preheat the oven to 170C (160C for a fan oven) and grease a deep, 8" round cake tin before lining the base with baking paper.
Beat the butter and sugar together until light and fluffy (use a paddle attachment if using a freestanding mixer).  Don't try to save time here - beat for a good few minutes to get a soft mixture and to incorporate lots of air as the air is what will give you a light cake.
Break the eggs one at a time into the butter and sugar, beating very, very slowly after adding each egg to incorporate it without the mixture curdling.  If it looks as though it's curdling, add a spoon of flour with each egg and continue to beat.
Add the almonds and the rest of the flour and beat until you have a glossy batter.
Finally add the chopped dates and the orange zest and stir together gently until combined before spooning the mixture evenly into the prepared tin.
Bake for 10 minutes at 170C (160C fan) before reducing the oven temperature to 150C (140C fan) and baking for another 60-65 minutes or until a knife or skewer inserted into the centre comes out clean. If you're worried about the top of the cake burning, cover it loosely with foil after about 45 minutes of baking in total to prevent this from happening.
To make the drizzle
While the cake is baking, make the drizzle by combining the sugar and orange juice together and stirring to combine.
As soon as the cake is out of the oven, leaving it in the tin, prick it all over with a knife or skewer.
Spoon the drizzle evenly all over the cake and then leave it to seep in.  It may look like too much drizzle but it will soak slowly into the cake, ensuring a moist sponge throughout.
Once the drizzle has all soaked into the cake and the cake has cooled a little, you can remove it from the tin.
For the toffee sauce
Melt the butter in a small saucepan over a low to medium heat.  Once it's melted, add the brown sugar and cream, and stir to combine. Simmer for five minutes until you have a thick pouring sauce.
The toffee sauce keeps in the fridge for a few days and can be reheated either over a gentle heat on the hob or in short bursts in the microwave.